A highly targeted phishing campaign has been hitting hotel guests across Luxembourg. Originally flagged by the Computer Incident Response Center Luxembourg (CIRCL), this campaign stands out not because of advanced malware, but because of its impeccable contextual credibility . Threat actors aren't guessing targets; they are hitting actual hotel guests on WhatsApp with exact, legitimate booking details to steal credit card data. As part of a technical review into the infrastructure, we analyzed a recent Indicator of Compromise (IoC) linked to this campaign: [https://stay-hotel607923.com](https://stay-hotel607923.com) . Here is the deep dive into how this attack works, the infrastructure behind it, and how to track it. The Attack Workflow: Smishing with Context Most phishing campaigns rely on volume, hoping a small fraction of a massive email list bites. This campaign relies on precision. The Data Exposure: CIRCL assesses that the campaign's source data may originate from servi...

Dynamic analysis
So in the last write up, I did a static analysis of a “Bitcoin miner”, so the next step in our analysis process is to do dynamic analysis.
In the dynamic analysis, we’ll execute the malware within a safe environment and monitor it’s process, file system, registry, and network activity.
Environment Set up
It goes without saying but we’ll need to ensure we have a safe environment set up before we execute the malware and have all the monitoring tools ready before execution. I’m using Oracle VirtualBox and I’ve set up 2 VMs in host-only mode.
- A Linux VM which is running Ubuntu 20.10 and a static IP of 192.168.1.100 assigned. The Linux VM will have Wireshark listening on the “enp03s” interface and INETSIM running to simulate internet services.
- A Windows 10 VM and a static IP of 192.168.1.50 assigned. The Windows VM will have process hacker and Noriben with Procmon running before I execute the malware. We could run more tools, also (like Regshot) but for now, I just want to keep it simple but effective. The Windows VM security policy to turn off real-time protection is enabled.
Executing the malware
Now that the environment is set up, it’s time to execute the malware.
I first renamed the file from 02ca4397da55b3175aaa1ad2c99981e792f66151.bin to 02ca4397da55b3175aaa1ad2c99981e792f66151.exe
and the file icon changed from


to


So we can tell it’s designed to disguise itself as a folder to trick a user to double click it to open.
Now that’s running, let’s check process hacker:


We can see it has started running as process but after that, I don’t see much else.
I let it run for about 1 minute and then terminate it from the process hacker.
After that, we can start to review the logging we had setup but just to add, I didn’t see anything else visually, which is something I was expected (but at the same time I was keeping an eye for anything unusual) because we didn’t see any dll imports or exports to indicate the binary using a GUI.
Network logs
I like to first look through the Wireshark logging to see the calls it made:
Let’s take a quick glance at some of the calls made:
“tshark -r file.pcap -Y http.request -T fields -e http.host -e http.request.full_uri”

We can see it made a number of requests to .ru websites (remember from the static analysis we had seen some of these URLs) and they are all HTTP requests (port 80).


We can see communication occurring between the two VMs but there is no weighty traffic.
If we look through Wireshark and filter the source to be the windows VM we see the following:
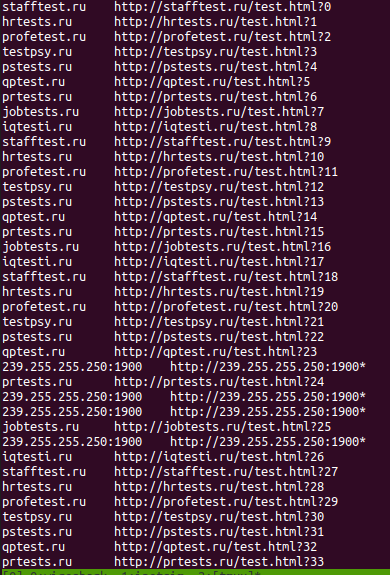
We can see the binary has been sending a ‘GET’ request to ‘stafftest . ru’ and has been incrementing the first parameter by one and it changed the URL (the above screenshot shows the order of different URLs it was changing on every increment). We can tell that it has gone into a loop of ‘GET’ requests.
If we follow the TCP stream we see:

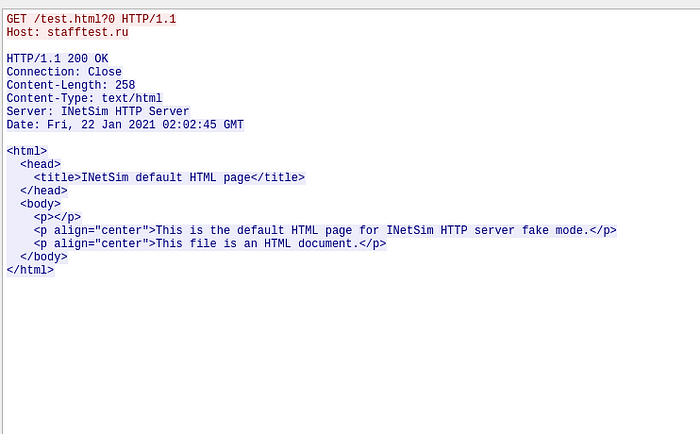
We can tell that the binary clearly doesn’t want an INETSIM HTML response, maybe that was the reason why it was in a loop because it did not get the response to meet it’s conditions.
A way for us to allow the binary to make a request safely to the internet is to set up a TOR proxy. This way the receiver won’t know the true source. (Another todo :) )
Ok, so after looking through it a bit more there wasn’t anything else the network logs revealed.
Procmon logs
So now let’s take a look through the process monitor logs we ran through Noriben.
Straight off the bat we see:
File Activity:
==================
[CreateFile] 02ca4397da55b3175aaa1ad2c99981e792f66151.exe:1768 > %LocalAppData%\Microsoft\Windows\INetCache\IE\EA51LVPB\test[1].htm [File no longer exists]
[CreateFile] 02ca4397da55b3175aaa1ad2c99981e792f66151.exe:1768 > %LocalAppData%\Microsoft\Windows\INetCache\IE\EA51LVPB\test[1].htm [File no longer exists]
[CreateFile] 02ca4397da55b3175aaa1ad2c99981e792f66151.exe:1768 > %LocalAppData%\Microsoft\Windows\INetCache\IE\EA51LVPB\test[1].htm [File no longer exists]
[CreateFile] 02ca4397da55b3175aaa1ad2c99981e792f66151.exe:1768 > %LocalAppData%\Microsoft\Windows\INetCache\IE\EA51LVPB\test[1].htm [File no longer exists]
[CreateFile] 02ca4397da55b3175aaa1ad2c99981e792f66151.exe:1768 > %LocalAppData%\Microsoft\Windows\INetCache\IE\EA51LVPB\test[1].htm [File no longer exists]
[CreateFile] 02ca4397da55b3175aaa1ad2c99981e792f66151.exe:1768 > %LocalAppData%\Microsoft\Windows\INetCache\IE\EA51LVPB\test[1].htm [File no longer exists]
[CreateFile] 02ca4397da55b3175aaa1ad2c99981e792f66151.exe:1768 > %LocalAppData%\Microsoft\Windows\INetCache\IE\EA51LVPB\test[1].htm [File no longer exists]
[CreateFile] 02ca4397da55b3175aaa1ad2c99981e792f66151.exe:1768 > %LocalAppData%\Microsoft\Windows\INetCache\IE\EA51LVPB\test[1].htm [File no longer exists]
[CreateFile] 02ca4397da55b3175aaa1ad2c99981e792f66151.exe:1768 > %LocalAppData%\Microsoft\Windows\INetCache\IE\EA51LVPB\test[1].htm [File no longer exists]
[CreateFile] 02ca4397da55b3175aaa1ad2c99981e792f66151.exe:1768 > %LocalAppData%\Microsoft\Windows\INetCache\IE\EA51LVPB\test[1].htm [File no longer exists]
This is normal as in the network logs we did see the binary make a ‘GET’ request to an a ‘test’ file, so it would have cached the file, which is normal, but we could say that since the binary did not get the file it was looking for, it removed it and kept trying (the loop we saw earlier).
Registry Activity:
RegSetValue] 02ca4397da55b3175aaa1ad2c99981e792f66151.exe:1768 > HKCU\SOFTWARE\Microsoft\Windows\CurrentVersion\Internet Settings\5.0\Cache\Content\CachePrefix =
[RegSetValue] 02ca4397da55b3175aaa1ad2c99981e792f66151.exe:1768 > HKCU\SOFTWARE\Microsoft\Windows\CurrentVersion\Internet Settings\5.0\Cache\Cookies\CachePrefix = Cookie:
[RegSetValue] 02ca4397da55b3175aaa1ad2c99981e792f66151.exe:1768 > HKCU\SOFTWARE\Microsoft\Windows\CurrentVersion\Internet Settings\5.0\Cache\History\CachePrefix = Visited:
[RegSetValue] 02ca4397da55b3175aaa1ad2c99981e792f66151.exe:1768 > HKCU\SOFTWARE\Microsoft\Windows\CurrentVersion\Internet Settings\ZoneMap\ProxyBypass = 1
[RegSetValue] 02ca4397da55b3175aaa1ad2c99981e792f66151.exe:1768 > HKCU\SOFTWARE\Microsoft\Windows\CurrentVersion\Internet Settings\ZoneMap\IntranetName = 1
[RegSetValue] 02ca4397da55b3175aaa1ad2c99981e792f66151.exe:1768 > HKCU\SOFTWARE\Microsoft\Windows\CurrentVersion\Internet Settings\ZoneMap\UNCAsIntranet = 1
[RegSetValue] 02ca4397da55b3175aaa1ad2c99981e792f66151.exe:1768 > HKCU\SOFTWARE\Microsoft\Windows\CurrentVersion\Internet Settings\ZoneMap\AutoDetect = 0
Unfortunately, we can’t gather heaps of information from the RegSetValue, why it’s setting these values, I don’t know, why it did it twice (maybe it’s in a loop), I don’t know but it trying to change the values under the “ZoneMap” would indicate it is going to set the values to allow the domain of the mining service as “allow” so that it’s not blocked by the targets machine.
Network Traffic
[TCP] 02ca4397da55b3175aaa1ad2c99981e792f66151.exe:1768 > 192.168.1.100:80
[TCP] 192.168.1.100:80 > 02ca4397da55b3175aaa1ad2c99981e792f66151.exe:1768
We’ve already analysed this TCP connection via Wireshark but it’s good to know we didn’t miss any other connections, like UDP.
Also, we can see that the binary has an open port on 1768. We did see in the imports section from PEstudio that uses “InternetConnectionA” (https://docs.microsoft.com/en-us/windows/win32/api/wininet/nf-wininet-internetconnecta) which is used for an open FTP and HTTP session, and from what we saw via Wireshark we know that it’s using it for a HTTP session waiting for the correct response from it’s “GET” request.
Ok, so we gained a hint of what the binary does thanks to dynamic analysis and what other techniques we could deploy if we were to execute it again (like use a TOR proxy).
But now we will need to dig deeper into the binary….
Comments
Post a Comment