A highly targeted phishing campaign has been hitting hotel guests across Luxembourg. Originally flagged by the Computer Incident Response Center Luxembourg (CIRCL), this campaign stands out not because of advanced malware, but because of its impeccable contextual credibility . Threat actors aren't guessing targets; they are hitting actual hotel guests on WhatsApp with exact, legitimate booking details to steal credit card data. As part of a technical review into the infrastructure, we analyzed a recent Indicator of Compromise (IoC) linked to this campaign: [https://stay-hotel607923.com](https://stay-hotel607923.com) . Here is the deep dive into how this attack works, the infrastructure behind it, and how to track it. The Attack Workflow: Smishing with Context Most phishing campaigns rely on volume, hoping a small fraction of a massive email list bites. This campaign relies on precision. The Data Exposure: CIRCL assesses that the campaign's source data may originate from servi...
We’ll need to evaluate the performance of the detector built to ensure that we are achieving a higher true positive rate than a false positive rate. Also as we increase the types of features built and used, we’ll need to monitor their performance.
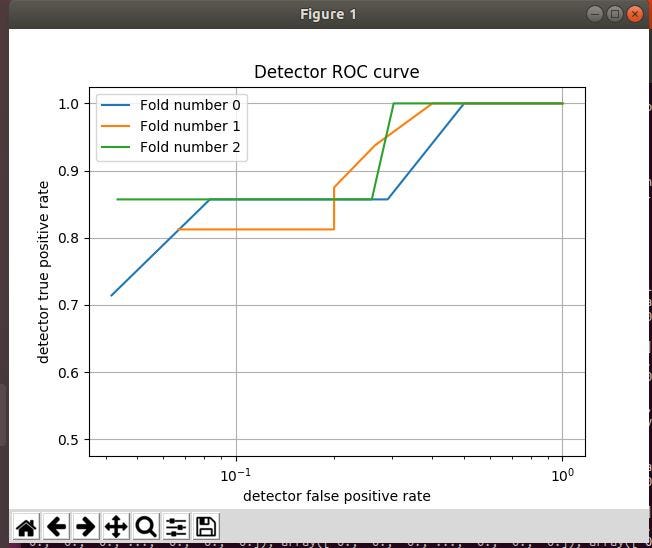
ROC Curve
In order to evaluate the performance of the detector, we are going to use the Receiver Operating Characteristic (ROC) curve. We plot the false-positive rates against the true positive rates at various thresholds. This will help determine how to configure our detector to get the optimal settings. Detectors are not perfect, there will be false positives but we can use this method to reduce the false positive rate and increase our true positive rate.
When you think about the process and the possibilities then it seems like a never-ending story but we should look at it as evolving our detector.
As we implement our function to evaluate the detector performance, we will delve further into the requirements of the ROC curve and see the results.
Evaluate function
We have a function called cv_evaluate (remember, as always all the code is on my GitHub page):
def cv_evaluate(X,y,hasher)
We’ve known that “X” is the malware data, “y” is for the benign software data, and the hasher is set to “20000”
We’ll need to convert the training data (X, y) to “NumPy” arrays so that we can use NumPy's enhanced array indexing. (https://numpy.org/devdocs/user/quickstart.html)
The type of evaluation we will be doing is “cross-validation”. Cross-validation allows you to split the training examples into x fold and run a test where we pit the folds against each other by rotating each fold which is done by running multiple tests.
Sklearn has a class called “KFold” which has the module “cross-validation” we will use. (https://scikit-learn.org/stable/modules/generated/sklearn.model_selection.KFold.html)
for train, test in KFold(len(X),3, shuffle=True):
training_X, training_y =X[train], y[train]
test_X, test_y = X[test], y[test]
We pass the number of training examples into KFold, then we tell it we want 3 folds and to shuffle the data before dividing it into the folds.
Whilst in the loop, we will set our training X and y, test X, and y to the corresponding elements based on the result from KFold.
With our training data X and y set, we need to run it through our classifier (remember that we use the below to determine if it can tell if the binary features we passed into it is from malware of benign software.)
classifier = ensemble.RandomForestClassifier()
classifier.fit(training_X, training_y)
Now that we’ve fitted the data in, we can now get the scores:
scores = classifier.predict_proba(test_X)[:,-1]
fpr, tpr, thresholds = metrics.roc_curve(test_y, scores)
“fpr” = false positive rate and “tpr” = true positive rates
With our scores, we use “pyplot” from “matplotlib” to build our graph to see the outcome.
Now…we just need to run like a gazillion tests…..
Comments
Post a Comment